User stories are simple, short descriptions of features or requirements from the user’s perspective. They help agile teams understand what to build and why. However, managing user stories effectively can be challenging as projects become more complex.
User story mapping provides a visual way to organize and prioritize user stories, creating a shared understanding of the product journey. It helps teams see the big picture, showing how each story fits into the overall user experience.
In this blog, we’ll explore user story mapping, its benefits, and how to build a story map using Jira and Confluence. Let’s dive in!
What is user story mapping?
User story mapping is a collaborative and visual approach to organizing and prioritizing user stories that helps agile teams understand the user journey and deliver valuable products.
Definition and Principles
- Definition: User story mapping is a way to visually organize user stories to illustrate the product journey from a user’s perspective. It provides a structured overview of what needs to be done to achieve product goals.
- Key Principles:
- Customer-Centric: Focus on creating value for the customer by aligning user stories with their journey.
- Visual Collaboration: Involve cross-functional teams in creating and maintaining the story map.
- Prioritization: Clearly identify and prioritize the most important stories.
Benefits of User Story Mapping
- Shared Understanding: Create a common understanding of product goals and priorities among the team and stakeholders.
- Prioritization: Prioritize work to focus on delivering maximum value early.
- Collaboration: Foster collaboration and alignment between cross-functional teams.
- Iterative Planning: Facilitate iterative planning and release strategies.
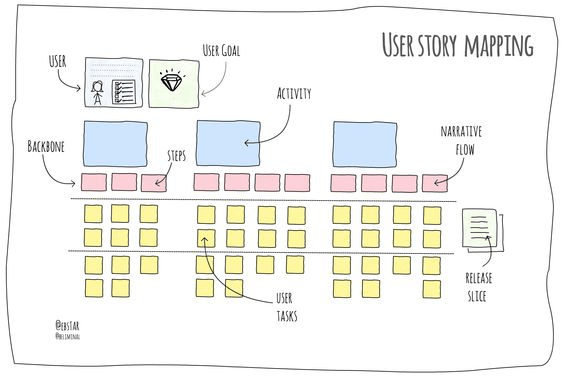
Anatomy of a User Story Map
- Backbone (Epics/Themes): High-level activities or major functions of the product.
- User Activities and Steps: Key user actions or steps grouped under each epic.
- User Stories: Detailed stories arranged under each activity to describe the work to be done.
Example of a Simple User Story Map
- Backbone:
- Shopping
- Payment
- Order Management
- User Activities and Steps:
- Shopping: Browse products, Add to cart, View cart
- Payment: Enter shipping details, Choose payment method, Confirm payment
- Order Management: Track order, Cancel order, Return order
- User Stories:
- Under Browse products:
- As a user, I want to filter products by category so I can find what I need easily.
- As a user, I want to search for specific products using keywords.
- Under Choose payment method:
- As a user, I want to pay via credit card.
- As a user, I want to pay via PayPal.
- Under Browse products:
How Does Story Mapping Differ from Traditional Backlogs?
- Traditional Backlog: Linear list of features, often lacking context or prioritization.
- Story Map: Visual, contextual representation showing how features connect to the overall user journey.
In story mapping, you organize user stories into a holistic view of how your system will work, not just a list of features.
Jeff Patton, Author of “User Story Mapping”
The goal of a user story map is to create a shared understanding of what the system needs to do and how that system will be used.
Mike Cohn, Author of “User Stories Applied”
How to Build a User Story Map
Creating a user story map involves collaboration and visual thinking to structure user stories in a way that aligns with the product vision. Here’s a step-by-step guide:
Step 1: Preparation and Planning
- Set Goals: Identify the primary goals or problems that the product aims to solve. Define the purpose and desired outcomes of the story map.
- Gather Stakeholders: Bring together a diverse group of stakeholders, including product owners, developers, designers, and end-users.
- Choose Tools: Select appropriate tools like sticky notes and markers for physical mapping or use digital tools such as Jira, Confluence, or Miro for virtual mapping.
Step 2: Create the Backbone
- Identify User Activities: Break down the user journey into high-level user activities or epics. These represent the major functions of the product.
- Sequence the Activities: Arrange these activities in the logical order they occur in the user journey.
Example Backbone:
- Shopping
- Payment
- Order Management
Step 3: Map User Stories
- Break Down Activities into Stories: For each activity, identify specific user steps and break them down into individual user stories.
- Arrange Stories in Order: Organize stories horizontally under each activity to represent the flow of the user journey.
Example Stories:
- Under Shopping:
- Browse products
- Add to cart
- View cart
- Under Payment:
- Enter shipping details
- Choose payment method
- Confirm payment
- Under Order Management:
- Track order
- Cancel order
- Return order
Step 4: Prioritize and Plan Releases
- Define the MVP (Minimum Viable Product): Identify which stories are crucial for the first release.
- Group Stories into Releases: Arrange stories into vertical slices representing distinct product releases or iterations.
- Prioritize Stories: Rank stories based on value and effort, focusing on delivering the most valuable features first.
Example Release Slices:
- Release 1: Browse products, Add to cart, Enter shipping details
- Release 2: Choose payment method, Confirm payment, Track order
Step 5: Collaborative Review and Iteration
- Review with the Team: Present the map to the team and stakeholders for feedback and alignment.
- Iterate and Improve: Regularly update the map as new information emerges, keeping it as a living document.
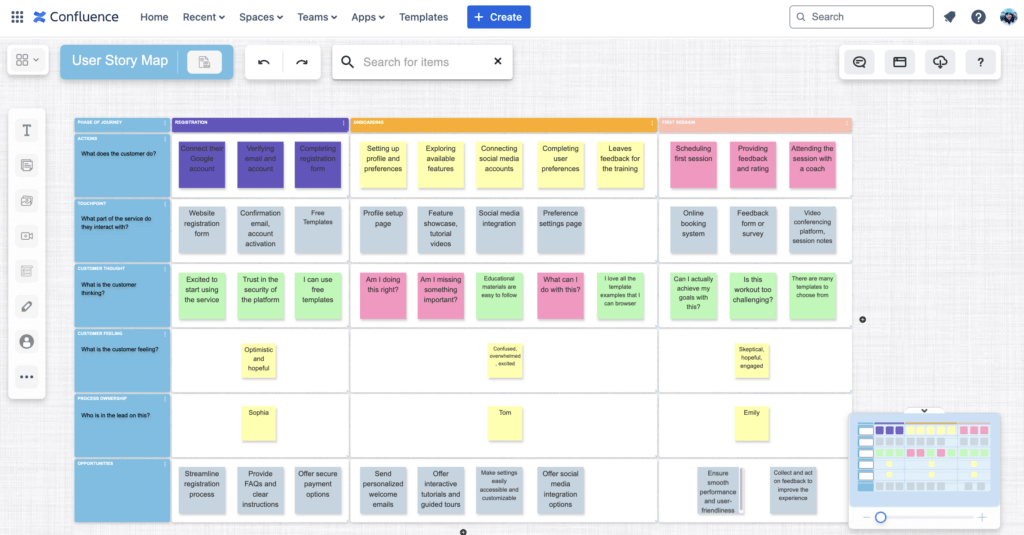
Using Agile User Story Map in Jira and Confluence
Combining user story mapping with powerful tools like Jira and Confluence enhances productivity, transparency, and collaboration. Here’s how you can use these tools effectively for agile story mapping.
Benefits of Using Jira and Confluence for Story Mapping
- Integration with Agile Workflows:
- Seamless alignment with Scrum and Kanban boards for better planning.
- Easy tracking of issues, epics, and user stories.
- Centralized Documentation:
- Consolidated documentation and visibility with Confluence.
- Link Jira issues to Confluence pages for comprehensive tracking.
- Collaboration and Feedback:
- Encourage teamwork through comments, mentions, and notifications.
- Easy feedback loops via Confluence pages or Jira comments.
Creating and Managing a User Story Map in Jira
- Create Epics:
- In Jira, create epics representing high-level user activities.
- Add a description to each epic to define its purpose.
- Create User Stories:
- Under each epic, create user stories representing individual features or requirements.
- Ensure each story is concise, clear, and follows the user story format: “As a [type of user], I want [feature] so that [benefit].”
- Organize Stories into Releases:
- Create versions/releases in Jira to represent different slices of your story map.
- Assign stories to relevant releases based on their priority.
- Visualize the Map with Jira Boards:
- Use Scrum or Kanban boards to visualize your user story map.
- Organize stories into columns or swimlanes to reflect their progress.
- Track Progress and Refine:
- Monitor the progress of epics and stories via boards or burndown charts.
- Refine and reprioritize stories as needed, using Jira’s backlog view.
Documenting the User Story Map in Confluence
- Create a Confluence Page for the Story Map:
- Create a new Confluence page and title it with the product or project name.
- Document Epics and Stories:
- List all epics with their corresponding stories, ensuring they follow the same structure as the Jira story map.
- Add detailed descriptions, acceptance criteria, and links to relevant Jira issues.
- Embed Jira Issues in Confluence:
- Use Jira macros to embed issues, boards, and filters directly within the Confluence page.
- This provides a live view of the story map’s progress.
- Encourage Collaboration and Feedback:
- Use comments, mentions, and collaborative editing to gather feedback from stakeholders.
- Regularly update the Confluence page to reflect changes in the Jira story map.
Example Workflow for Agile Story Mapping
- Create Epics and Stories in Jira:
- Define epics for the product backbone.
- Create stories under each epic representing individual user requirements.
- Organize and Prioritize with Jira Boards:
- Use a Kanban board to prioritize stories based on value and effort.
- Visualize progress and identify bottlenecks.
- Document in Confluence:
- Embed the Jira board or backlog in Confluence.
- Add supplementary information, discussions, and feedback.
- Review and Iterate:
- Review the story map regularly with the team.
- Update priorities and progress in Jira, and keep Confluence documentation in sync.
Introducing LeanBoard
LeanBoard is a versatile and collaborative plugin designed for Jira, Confluence, monday.com, and Salesforce. It provides lean and agile teams with powerful tools to visualize and streamline their workflows.
Key Features of LeanBoard
- Visual Collaboration: Create virtual whiteboards to brainstorm ideas, build business models, and design workflows.
- Flexible Integration: Seamless integration with Jira, Confluence, monday.com, and Salesforce for holistic team collaboration.
- Agile Planning: Plan sprints, roadmaps, and story maps visually, making it easier to prioritize and execute work.
- Workflow Visualization: Visualize your business models, workflows, and plans to identify bottlenecks and improve efficiency.
- Meeting Facilitation: Organize virtual meetings and workshops effectively by sharing whiteboards with teams.
How LeanBoard Enhances Story Mapping
- Effortless Mapping: Create and manage user story maps directly on a virtual whiteboard.
- Drag-and-Drop Interface: Organize user stories with a simple drag-and-drop interface.
- Collaboration Made Easy: Share your story maps with team members for real-time feedback and collaboration.
- Integrated with Jira and Confluence:
- In Jira: Link user stories on LeanBoard directly to Jira issues for seamless tracking.
- In Confluence: Embed LeanBoard whiteboards in Confluence pages for comprehensive documentation.
Why LeanBoard is Ideal for Agile Teams
- Visual Planning: Story maps, business models, and workflows are made visual, providing clarity and alignment.
- Cross-Functional Collaboration: Teams across different departments can collaborate on a unified platform.
- Agile Mindset: Supports iterative planning and encourages feedback loops to improve processes continually.
Best Practices for Agile User Story Mapping
To make the most out of user story mapping, it’s important to follow proven practices that align your team around a shared understanding and deliver maximum value. Here are some best practices to consider:
1. Keep the Customer at the Center
- Understand User Needs: Start with a clear understanding of the customer’s needs, challenges, and goals.
- Define Value: Ensure that each user story reflects a meaningful benefit to the end user.
- Empathy Mapping: Use empathy maps to better understand user motivations and behaviors.
2. Collaborate Effectively
- Involve Key Stakeholders: Include product owners, developers, designers, and other relevant stakeholders in mapping sessions.
- Encourage Diverse Perspectives: Invite team members from various departments to bring different viewpoints to the table.
- Create a Safe Space: Foster an environment where all team members feel comfortable sharing their ideas and opinions.
3. Iterate and Improve
- Treat the Map as a Living Document: Regularly review and update the user story map as new information emerges.
- Gather Continuous Feedback: Seek feedback from stakeholders and users to refine and improve the map.
- Test and Validate: Validate user stories through prototyping or user testing to ensure they deliver real value.
4. Align Mapping with Delivery Cadence
- Define MVP (Minimum Viable Product): Identify the core features necessary for the initial release.
- Prioritize Releases: Organize stories into releases or vertical slices based on business value and feasibility.
- Small, Incremental Releases: Aim for frequent, incremental releases that deliver valuable features.
5. Focus on the Big Picture
- Create the Backbone First: Start by outlining high-level user activities or epics to establish the product journey.
- Avoid Isolated User Stories: Arrange stories in a way that shows how they contribute to the overall user journey.
- Story Mapping is not a Backlog: Use the map to visualize the journey, not just to create a list of features.
6. Keep It Simple and Visual
- Use Visual Cues: Leverage color-coding, icons, and swimlanes to highlight important information.
- Avoid Overloading: Limit the number of stories visible at one time to prevent cognitive overload.
- Short and Descriptive Stories: Keep user stories concise while ensuring they clearly convey the feature’s purpose.
7. Integrate Tools and Documentation
- Use Story Mapping Tools: Tools like LeanBoard, Miro, and Jira help teams visualize and manage story maps efficiently.
- Document in Confluence: Keep detailed documentation of your story map in Confluence for easy reference.
- Link to Jira Issues: Ensure stories are linked to Jira issues to streamline development workflows.
By adopting these best practices, your team can create user story maps that align everyone on delivering customer value. Remember to keep the customer at the center, collaborate effectively, and treat your story map as an evolving document that guides iterative planning and development.
Give these practices a try and see how they improve your team’s user story mapping experience!
Related Blogs: